Here ya go a blog tutorial.
How to make a blog tutorial
Funny enough my favourite program to make blogs with is Microsoft Word. So in order to make a blog you’ll need an image and word. I will be using this image
images.neopets.com/games/new_tradingcards/lg_poogle_2006.gifSo first off import your picture into word click Insert>Picture>From File… Find your picture and insert it. You can do whatever you like to the picture, I’ve added some word art, but you can edit your photo in whatever image program you like.
Now you need to make a rectangle for text so open the AutoShapes toolbar by clicking Insert>Picture>Autoshapes. Click on basic shapes, the icon looks like this,

and choose Rectangle. Place the rectangle wherever you want your text to be in the picture. It will look something like this.
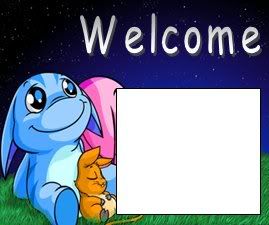
Now right click the rectangle you just made and then click on Format AutoShape. Go to the Colors and lines tab and set the transparency to around 34%. You can add a border to your rectangle by changing the line settings.
Next you need to take a screenshot of your blog
And then crop it down so it is just your blog
There now your graphic is ready to be coded.

<center>
<table width="
270px" height="
225px" background="
i91.photobucket.com/albums/k306/guild_pic/blog2.jpg" border="0">
<tr><td height="
80"></td></tr>
<tr><td width="
115"></td>
<td>
<div style="width:
138; height:
110; overflow: auto; scrollbar-arrow-color:
#556B2F; scrollbar-darkshadow-color:
#6B8E23; scrollbar-track-color:
#9ACD32; scrollbar-face-color:
#6B8E23; scrollbar-shadow-color:
#556B2F; scrollbar-highlight-color:
#D15FEE; scrollbar-3dlight-color:
#8B668B; font-size:
9pt; color:
black; text-align:
center; font-weight:
bold; font-family:
verdana;">
Stuff Goes Here. Please leave credit.<br>
<br>Coding help from emporers-village-neo.co.nr <br><br><br><br><br><br><br><br><br><br>
</div></td></tr>
</table>
</center>
So that’s the code you need to code your blog. I’ve bolded things that you can change. Red is stuff you will have to change the first bolded red part is your blogs image source, the second is your text that will appear in your text field.
The yellow bolded parts are unique to your blog. The first two control the size of your blog, the second two control where the upper left hand corner of the text box will be, and the third two will control the width and height of that text box. For the width numbers the higher the number the more to the right the point will be, for height the bigger the number the lower it will be.
Finally the black bolded parts are pretty standard and you don’t have to change them unless you want to. They control scrollbar color and font.
So that’s it you will now have a wonderful blog.
<center>
<table width="270px" height="225px" background="http://i91.photobucket.com/albums/k306/guild_pic/blog2.jpg" border="0">
<tr><td height="80"></td></tr>
<tr><td width="115"></td>
<td>
<div style="width: 138; height: 110; overflow: auto; scrollbar-arrow-color: #556B2F; scrollbar-darkshadow-color: #6B8E23; scrollbar-track-color: #9ACD32; scrollbar-face-color: #6B8E23; scrollbar-shadow-color: #556B2F; scrollbar-highlight-color: #D15FEE; scrollbar-3dlight-color: #8B668B; font-size:9pt; color:black; text-align:center; font-weight: bold; font-family: verdana;">

Stuff Goes Here.  Please leave credit.

<br>
<br>Coding help from emporers-village-neo.co.nr <br><br><br><br><br><br><br><br><br><br>
</div></td></tr>
</table>
</center>